Using apply image in Photoshop
Hi folks
In this blog i want to show you how i use Apply image for applying selective adjustments in photoshop. I will be doing a tutorial video on this so make sure and subscribe to my youtube for that. I will also be doing a blog and video tutorial on using apply image to blend exposures in photoshop, i was going to put it into this blog however i think it would be too much to take in all at once!
So for this blog we are going to simply take an image and apply adjustments to the highlights using apply image. It can be a very effective tool and more accurate than simply brushing in adjustments using an adjustment brush in lightroom or camera raw. So lets jump into it
“Sunset Road”
This is an image taken on the burren coastal road in Co Clare. I liked how the road led away into the sky and it was during golden hour so we were beginning to see some nice tones in the sky however i could not accurately get the warmth of the sky back in the image without affecting the entire image itself. There are many ways to do this but for this blog we will look at using apply image with a warming filter
1) Open the image in Photoshop
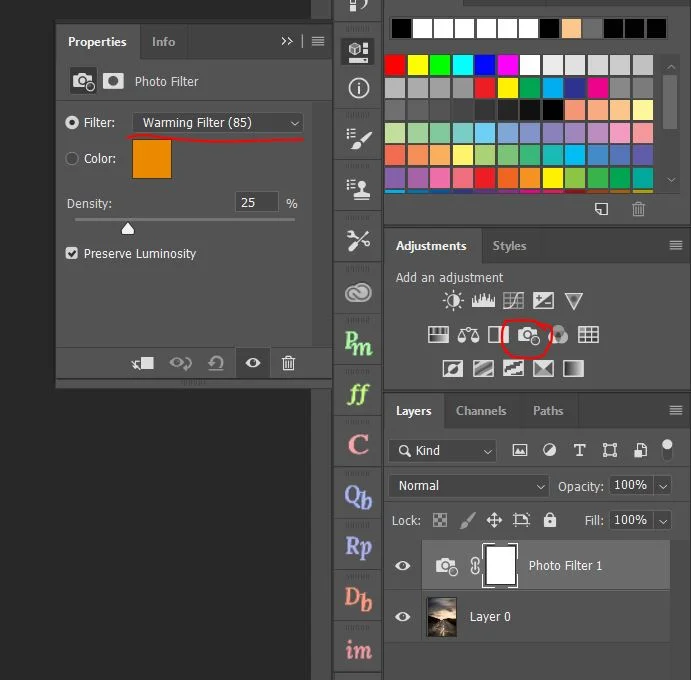
2) Click on the photo filter icon in the adjustments panel and select the warming filter. Adjust the density to your taste
3) Make the photo filter layer invisible by clicking on the eye icon
4) Go up to the toolbar and select and apply image. Make sure your settings are the same as mine below and click ok. Make your photo layer visible once again and you will now see the filter should have applied adjustments to the highlights of your image.
Your not done yet. As you can see the filter has affected too much of the road and ditches which is what we don’t want. It has given it an ugly yellow haze. We can fix this in two ways.
1) You can choose a black brush, set the opacity to between 70-90% and brush away the areas you don’t want the filter to affect
2) You can adjust the mask apply image created by first holding Alt or option and clicking on the photo filter thumbnail. You should see the image go black and white. Next press Ctrl+L or Command+L to open up the levels of the mask. Now you can pull the sliders along to make a slightly more contrasting mask which will target only the highlights of the image. Remember when making selections using masks in photoshop, whatever is white will be selected and everything from dark grey to black will not (in the case of targeting highlights and using bright masks that is but dont get too bogged down in this yet). See screengrabs below if you are lost
Once you have adjusted the mask you should see the warmth targeted more towards the highlights and less of the foreground. If this concept is confusing do not worry. It is something i will be discussing a lot when i speak about exposure blending and using apply image/luminosity masks to blend exposures.
After this you can edit the image to your taste. The purpose of this blog was to show you how apply image can be used to make selective adjustments. This is not exclusive to the warming filter! This can be used with any type of adjustment layer you wish to do in Photoshop!
After that i adjusted the color balance slightly and masked out areas i did not want affected by the warming filter using the black brush!
Before
After
And there you have it! A really simple way to apply adjustments using Apply Image in photoshop. There are multiple ways to do this but i think that by using apply image you get familiar with masks and how to adjust selection masks to make a more targeted selection which will stand to you when it comes to exposure blending!
Please stay tuned for the youtube tutorial on this and i hope you have enjoyed reading the blog and of course i hope you have learned a thing or two!
As always thanks for reading,
Good luck!


